Tuesday, May 29, 2012

Fun, Painted, Interior Doors with Fresh Pops of Color

I am brainstorming ideas for my client's master bathroom door.  We found a beautiful, old, Victorian front door with leaded glass in half of it at the salvage yard.  We had the glass repaired and bought a very rustic, industrial set of barn tracks to hang it on.  One side is painted white and the other side is stained a cherry color.  

I asked the painter to sand it down as far as he could go without stripping it to see what it would look like, but my client is leaning towards having the whole door painted in a fresh, glossy, new paint.  I could go either way, but I think I'd prefer the rustic, as-is look.  I'd  be open to doing one side freshly painted and the other not.  We'll see if I can convince him. 

For now, I found some inspirational photos of doors painted with fun pops of color.  We'll see what inspires us both and when it's finished I'll post a photo.

Take a look...


This high gloss plum colored door leads from the dining room to the butler's pantry.
room with purple door
Source: House Beautiful. Maura McEvoy

Yellow is so much fun!  It's the color of the sun.
Source:  Pia Ulin via Apartment Therapy
This door brings a smile to my face.
Door_2_rect540
Tobi Fairley via Domino
Door_2_rect540
Source:  Meyer Davis Studio via Irene Turner


Anything painted a faded blue/gray is gorgeous to me!  So Swedish!
Source: Unknown


I do wonder how black would look.  I think it could be really fun.

Source: Unknown

This is a fabulous yellow/green color.  Hmmm....this color would work well.

Source: A San Francisco entryway by Feldman Architecture


Back to the old, custy, paint chipping, half-on, half-off look.  There's something about it.  I do love it.
Old Doors In The Hallway
Source:  From Modern House Insight

Tuesday, May 22, 2012

DIY 1-2-3: Refinishing an Old Oak Desk with Annie Sloan Chalk Paint

I have been a busy bee lately working for my clients and myself! One of my latest home projects is refinishing a desk I bought at the Alameda Flea Market for $45. I refinished it for my son who has been begging me for a desk for months now.  I tried out Annie Sloan's Chalk Paint and love it.

The Before: Well, not really. This isn't the actual desk I bought. I forgot to take a before picture because I was in a mad rush to finish the desk for my son, but this one is close enough.


The After:  I sanded down the wood on top and the drawer fronts to the natural oak and painted the body in "Graphite" colored Chalk Paint. 
Before I researched Annie Sloan's Chalk Paint (from England) I spent two days sanding this enormous old Oak desk outside on my driveway.   And, I sanded it after I used a product to remove the thick polyurithane coating over the stain.  My goal was to completely remove the stain from the desk top to arrive at it's nartual oak color and then paint the rest of it a steel gray.  After numbing my hands with the palm sander I remembered my Mom mentioning this chalk paint which is supposedly applied without sanding.  I was skeptical but curious.


This is what Annie says about her chalk paint...and it's true!

Painting with our paint should always be a pleasure.
Annie Sloan developed her now famous Chalk Paint to answer the need she had for a paint which would have many uses from acting like limewash to looking like old painted furniture and that had a good range of colour that could be extended by the user. This paint is very easy to work with and allows people to be creative as one doesn't get involved with the technicalities of preparation and it also allows you to change your mind without hassle.

I drove out of the city to purchase this paint from the Pickled Hutch which costs $40 for a quart and was happy to see that the limited range of colors were all gorgeous. I had a hard time choosing and ended up buying three pots of paint to try for a host of projects I am cooking up around the house. 


Provence               
Old White


Graphite


I also bought a paint brush because it looked so stylish and interesting and almost as if it would paint my furniture itself.


The other thing you're supposed to buy is Annie's special wax to coat the paint afterwards, but I already had a big pot of Briwax beeswax so I decided to risk it and use that instead of spending another $40.  It worked out great, as far as I can tell.
When you apply the paint it goes on thick and dries very quickly.  I'd say it was completely dry within 30 minutes. It's very chalky, hence the name chalk paint.  If you don't apply the wax it feels like chalk, but if you do wax it, the painted wood feels silky and smooth.
I decided to apply the wax only to the legs and around the drawers because after you apply the wax it makes sanding the paint off to expose some of the unpainted edges easier. It's true!


Here you can see up close the exposed natural wood that easily peeked through the chalk paint when I lightly sanded.  With the wax coating, it's really easy to create a nice consistency to the paint variations by lightly sanding.  For fun, I painted the door handles with black chalkboard paint so my son could label what's inside his drawers.  This I picked up at Lowes.

Chalkboard Finish, Black Chalkboard Finish

I hope you enjoyed my flea market project!  I'm hoping this nice, new, big desk will inspire my son to do his homework right after school!

Wednesday, April 18, 2012

A Fairy Tale Home for the Birthday Girl

I thought I was going to drop my daughter off at her friend's birthday party until I walked in and saw the magical scene my friend Kelly created for her daughter Lucie.  I was so captivated, I could not bring myself to leave!

Kelly turned her home into an enchanted forest filled with gnomes, moss covered vases, dripping, gigantic flower arrangements, and fairy dust.  Kelly's love for her daughter Lucie poured all over her magical home. It was so dreamy, I just had to share it with you.

How cute is that little gnome perched inside the pink roses?!

The dining room table was packed with goodies

The Fairy Mom herself, Kelly, arranging the table.

Of course Kelly made "Fairy Berries" for the girls.

Even without a fairy tale party, Kelly and Kai's home feels magical.  Just look at this beautiful purple glass chandelier dripping with gold ribbons for the party. Not a detail was missed.
At first I thought Kelly painted this magical scene. She actually found this wallpaper at Jeremy's and taped it onto the walls, covering the room.  She placed a large white blanket on the floor so the girls could play and eat in this magical forest.
How cute would that wallpaper be in a little girl's room?!
Kelly bought cupcakes from the bakery but made this gorgeous flower arrangement herself.  Can you see all the charming details on this beautiful, mirrored table-- the moss covered purse, the book of gnomes, the little fairy portraits.  So clever.

You may be asking yourself, "How does Kelly do it?"  Of course, it's magic!  But this is her studio up on the fourth floor of her home where inspiration oozes out of her, spilling all over the floor!


Kelly glued moss on cardboard cups to make fairy houses for each of the girls

Then she filled bowls full of little rocks, feathers, shells, sparkles, flowers, and jewels so each girl could decorate her own fairy house. 
The girls also went on a fairy hunt in the forest in search of more gems to sprinkle on their little fairy houses.  So fun.


Even the frog feels inspired by Kelly's enchanted birthday party for Lucie.  I hope you feel inspired too.  Have a magical day!

Monday, April 9, 2012

Woody Wood Pecker-- Pay Now, or Pay Later!

The creation of our master bath was the outcome of a series of mistakes and I wouldn't have it any other way.  The first mistake was the fumigator broke down at the mill where my 100 year old reclaimed wood from Kentucky needed to be treated for wood pests, just in case. 

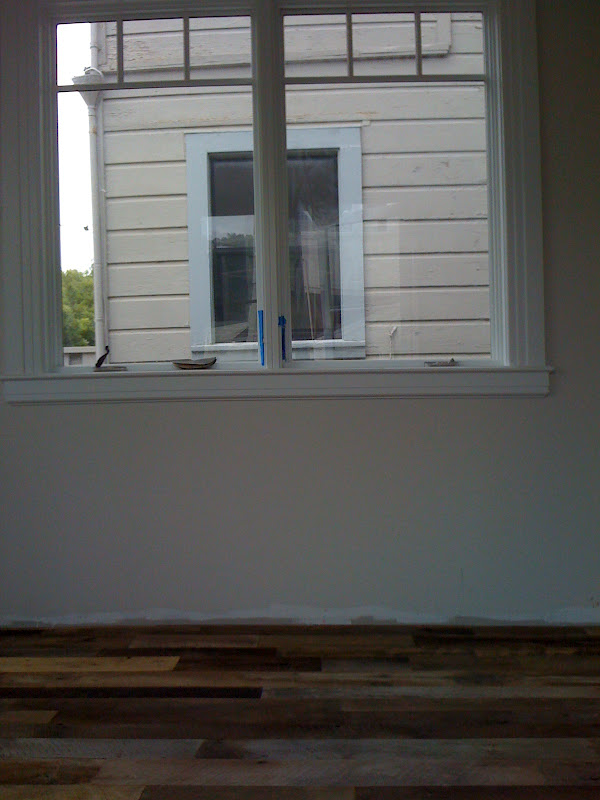
The delay at the mill meant the kitchen flooring was going to be installed after the cabinets.  Then I realized something. I was going to have extra reclaimed wood because I was now putting plywood under my cabinets instead of flooring. I ran the calculations and realized I had exactly enough to use the flooring as wainscoting in the master bath.  Why not?
I called the flooring guy and told him to straight cut the extra wood planks so I could put it on the wall instead of the floor.  It turns out I had exactly enough for both.  Really. Exactly enough.  Good thing it's reclaimed because it doesn't have to be perfect. At the end the installer was putting bits and pieces here and there to complete the puzzle.  That section is underneath the sofa.


My contractor's guys installed the reclaimed wood in the bath when I was not on site.  When I came that Friday night to take a look I saw they had done exactly what I asked them to do.  And it wasn't right. It was too woody.  It was woody wood pecker!


I took the line of the marble backsplash to carry the top of the wood and it was off.  I stared at it, realized the annoying truth, and called Steve.  Steve, who barely had an opinion about my design decisions, came to check it out and agreed that it was ugly and gave me the green light to do my thing.  I spent the entire weekend ripping it off, re-cutting it, and putting it back on. Too bad they used liquid nails.  I wasn't expecting I'd be taking off part of the wall off too!

The painter was at the house that weekend as well and helped me remove part of the toilet which I didn't realize was hard to do and was necessary to get the wood off. Thank goodness he was there because I might be staring at some awkward reclaimed wainscot had he not been.


Things always seem so simple in my head, but reality rarely matches. I wasn't finished by Monday and when my contractor, William, saw what I had done, he felt bad and offered to finish it for me. I declined. I felt bad that I made the mistake of not thinking about the height of the wood and didn't want him to pay for my mistake. Also, I knew there'd be other mistakes we'd have to un-do that I couldn't fix myself. Tiling being the main one. I think there were three tile installation re-dos alone.  I was running out of lives with my contractor. Eventually, I was going to break him in my constant pursuit of the perfect house.

In the end, the pain and frustration I went through spending an entire weekend un-doing and re-doing my bathroom wainscot pales in comparison to the irriation I would still be facing looking at some awkwardly placed paneling.  I always tell my clients that remodeling is like childbirth. You go through a lot of pain, but when it's over, it's over and you're happy...and most importantly, you forget what you went through.

Here's how it all turned out... I'm so glad I "paid now" and not later.

Miller Pelaez master bathroom after remodel
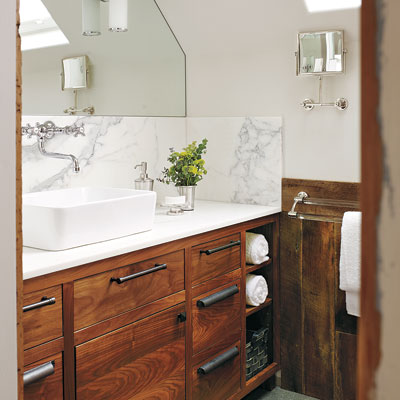
This Old House Magazine.  Photo by James Carriere
P.S.  Notice how the electrical outlet disappeared in the marble backsplash above?  It's amazing how "they" make photographs picture perfect for magazines.  I just noticed that little edit.

Monday, March 26, 2012

Powder Perfect for Under a Grand...Plus Some Blood, Sweat and Tears

From this...

....To this for under $1,000 in a week

A couple months ago I received a text from my friend Noelle with a surprising photo in it.  Shortly after seeing her that afternoon, she unexpectadly ripped out all the hideous tile from her powder room wall and floor. I saw framing and subfloor in the photo, and the message, "Now what?" 

Anything is better than what was there before. For me, this was a wonderful surprise! It also brought back memories of my first house. I accidentally did the same thing in my powder room in a one-thing-leads-to-another fashion.  These things just seem to happen to people who cannot stand to live with an ugly bathroom!  "I swear, the tile just fell off the walls!" I told my husband.  I'm not sure what Noelle told her's but...

With company coming and a potential holiday party looming, there was work to be done.  And, of course, Noelle wanted it done on a dime.  I love this kind of challenge-- no time and no money.  I promised her I'd help and so it began...

I called in some favors.  My drywall guy came right away to patch the walls.  He charged her a couple hundred bucks.  Noelle found a reasonably priced hardwood floor guy from her brother. The flooring guy re-did the powder room floors while putting in new kitchen flooring. We estimated that to be around $200.

I suggested Noelle paint the entire room the same color, including the trim since it's a small space and we didn't want to call attention to the tiny moulding. She used some paint she already had in the garage for this. The only problem was that it's glossy. I suggested she lightly sand the walls to bring out a hint of the more calming white primer, tone down the gloss, and fade the color. It worked great although it's impossible to tell in these photos since the light is reflected from the mirror in the small space.

Next, Ben installed the mirror trim, but not without a fight.  He spent the better half of one his weekend arguing with the chop saw about uneven walls.   This was his first moulding project in a 90 year old house.  Ben's a perfectionist when it comes to home improvement so he wasn't pleased with the gaps in the moulding.  I suggested Noelle play off the imperfections and beat up the wood with a hammer and then rub off some the dark gray paint (leftover from her exterior paint job) with steel wool to make it look aged and rugged.  She then took some nails from Paxton gate and hammered them into the mirror frame for added texture and interest.


Next we called in JT from Pacific Coast Glass to put in a beautiful custom mirror.  We were so excited as this was the "star of the powder room."  We actually video taped the installation and interviewed JT about his business.  I've been using JT for years for my projects but have never actually seen him do the job.  It was interesting to watch how he attaches these heavy mirrors to the walls single handedly.  Living in earthquake country I always feel better having them glued to the wall instead of just hanging there but it was  a little nerve wrecking watching the process.  The mirror cost around $200.

During Noelle's demo phase, she accidentally whacked the toilet. She purchased a new one for $200. Unfortunately, this wasn't a simple replacement. Ben spent another entire weekend wrestling with toilet rings. He eventually called my jack-of-all-trades handy man, Wai Woo, who told him what Ben already knew but wasn't thrilled to do. He had to cut the pipe. After that he was able to get the toilet installed properly.  (All of these annoying problems are not making the case for a similar re-do of Noelle's full bath!)

Noelle found a great ceiling light fixture online for just $100 and of course she popped in one of her Edison bulbs. 


There's a so-so window in this bathroom which is great for bringing in natural light but not the best to look at.  I suggested she cover it up with some airy fabric to filter the light and hide the window. Noelle had this fabulus Anthropologie shower curtain on-hand and cleverly installed it over the window using some thick rope in lieu of a curtain rod.  What a great look!


Noelle used some great nails from Paxton gate to hang the toilet paper and hand towel. She originally popped another nail in the wall for a hand towel but it turned out to be in an awkward place.  Instead of ripping it out she kept it there and hung an old rusty bell there.  I guess the kids can ring it if they run out of toilet paper!


The airplants floating on the walls is the finishing touch in this perfect powder room. 


Noelle got great deals on the flooring, mirror and drywall installations by shopping around. (She often got quotes that were double or triple what she ended up paying).  Noelle and Ben did a ton of work themselves (installing a new toilet, painting, installing mirror trim, and putting up accessories).  And, they re-used materials they already had (window treatment, paint, and moulding).  It wasn't easy but it was done on a dime.  This entire bathroom cost them under $1,000 and it was completed in a week and more importantly they're still married!


I really enjoy remodeling with a challenge.  This bathroom has a clever design that neither Noelle nor Ben would have dreamt up if they had an umlimited budget.  I truly believe that sticking to a budget leads to a more innovative and creative design process with unique one-of-a-kind results. Congratulations Noelle and Ben for creating a wonderful new powder room on budget and in record time.  We're so curious how you will tackle the full bathroom.  Right, Ben?

Monday, March 19, 2012

Good, Fast or Cheap?

Dear Readers,

I wanted to share the most important lesson of remodeling-- good, fast or cheap?

My friend Amy remodeled her entire home a couple years ago.  When she told me about the contractor she hired she said excitedly, "He's good, fast and cheap!"  I wrinkled my nose and said, "No way.  You only get two. No contractor has all three." 

Sure enough, the "good" slowly faded because he took short cuts to be "fast."  Then the "cheap" went out the window when she got her astronomical change order fees.  When tensions rose between the contractor and her husband the pace slowed down and there goes "fast."  She ended up losing all three magic bullets by trying to obtain all of them at once.  She now realizes you can't have them all.  Which ones do you choose?

In my work as a remodel consultant, I assess each client differently.  Do you want good and fast?  Then you're going to pay for it.  Do you want fast and cheap?  It's not going to be good.  Do you want good and cheap?  We're going to be working together for a while then.  All three just don't exist together and different people have different needs.

There are so many trade-offs you have to make while remodeling your home. One thing I have learned never to trade is hiring quality tradesmen.  I want to spend time working with people who love what they do and care deeply about their contribution to the project. One of my contractor's guys walked out on my job once because he didn't put the cabinet handles in the right place, and I told him so (in a polite manner, of course).  My contractor literally had to chase him down the street and convince him not to quit.  Obviously, this guy didn't like working with me, but I expect the best from the people I work with and I don't settle. If something isn't right, it has to be fixed. Period.  "Good" is not an attribute that's up for grabs for me. 

I deal with budget trade-offs around the clock.  I have a client who started off with a kitchen facelift that snowballed into a full gut and re-do.  When he saw what "cheap" got him, he realized exercising the true potential of his space was more important than trying to save money.  He chose "good" over "cheap" and I think he's going to be over the moon (and over the loss of the initial budget) when his kitchen is complete. 

I've worked non-stop to get him all the elements he wanted-- open layout, big island, farmhouse sink, floating reclaimed shelves, a pantry, and tons of character in keeping with his 100-year old house.  We've thought about every wall, every angle, all the possibilities and every move he will make in that kitchen.  We nailed it and I can't wait to see it come to life.

The one trade-off in maximizing his kitchen layout and finishes is the cost.  He's definitely spending more than he initially thought but I am convinced the value he's creating is worth the expense.  Often I feel like a "house fund manager" for my clients.  I help people manage one of their biggest investments-- their home-- and I take that responsibility very seriously. 

While my goal is to help my clients create beautiful, functional homes I also feel very strongly about my obligation to steer them in the right direction financially.  There is always a line to be drawn with how much you should spend on a given property.  There are many upgrades and choices you can make to a home that really aren't worth it. I help my clients make those choices but sometimes I have to give in.  Sometimes they just have to have something that speaks to them and not necessarily to the value of their property.  I call those "gifts."  I tell them this is a present to yourself for putting in so much time and energy into remodeling your home. Enjoy it.

I hope you give yourself the gift of understanding the trade-offs that are right for you and your home. Everybody has different values. I encourage my clients to spend a lot of time thinking about how they live in their homes and what's important to them. I say that all the time and effort we are spending together to design your space and deal with construction is tiny compared to the amount of time you will live in your new space.  Measure twice and cut once, right?  Take the time to get to know yourself and your home before making your selection. 

Which two do you favor-- good, fast or cheap?

Happy Remodeling,
Jenna

Tuesday, March 6, 2012

I Made a Contractor Cry Today

I'm not sure how it happened, but my window installer started balling in my bedroom today.  For a year and a half, I had been trying to get him to replace faulty jamb liners in the windows he installed.  He simply dropped the ball (for a very long time) and after I complained to the contracting license board, five days later he was at my front door.

It's not like he disagreed with me.  He told me a year and a half ago that he no longer uses my jamb liners and that he would replace mine with ones that worked.  Unfortunately, it took a formal complaint to get him to do what he promised. 

I have to admit when I saw him at my door, my blood was boiling.  He came over to measure so he could fix the problem but I just had to know...Why didn't you respond to my calls or e-mails for the past year?  Of course he couldn't answer. We went at it for about 10 minutes. It ended with him saying, "I draw the line.  You're insulting my child."  I'm not sure where that one came from but I realized then and there that my jamb liners and me were not the reason he didn't respond.  There was something else going on.

I found out that he was overwhelmed with personal issues-- a sick baby, his dad had to leave the country to have surgery, he felt anxious about his dual responsibilities managing his install business plus his dad's window shop, being a new father...  It all compounded and the client with the crappy jamb liners is one of many balls (I would assume) that was dropped.

As he told me about his feelings, he started crying.  I told him  I was sorry I got so upset and that it was OK.  We could start over now.  I understand that in the scheme of life, windows are just windows and that what really matters in life is people.  He said he understood why I was so upset and that he would have been upset too.  We both promised each other a clean slate.  I told him that everybody makes mistakes and that it's important to learn from them.  I told him that if life overwhelms him again, he should pick up the phone and be honest with his customers.  I think he understood and we made up with a hand shake.

In the end, the whole experience reminded me that the business of remodeling homes involves people.  People have other lives outside your remodel project.  They have illnesses to cope with; they have work and family lives to balance; they have problems finding answers; they have "to do lists" that go unchecked. They're just people.

It also reminded me of how important communication is.  No one is perfect.  No one gets it all done perfectly every time, but when you're in the service business it's important to be honest and to tell people what's going on.  Even if it's not the answer they want to hear honesty is always the best policy.